
Written by Samitha Nanayakkara – Associate Tech Lead at Calcey
React Native is a favorite of mobile app developers everywhere as it allows you to build multi-platform apps using a single codebase.
However, as the complexity of an app increases, so does its size. Unoptimized code and assets lead to larger apps which consume valuable storage space on the devices they’re installed. Larger apps also mean slower downloads, and it could lead to users abandoning the app altogether out of frustration.
That is why it is vital to optimize assets such as images and animations. Doing so can drastically reduce app size and improve overall performance.
A developer can
- Optimize the size of images AND
- Optimize the resolution of images
Optimizing the size of images
PNG images are popular with React Native app developers due to their efficient rendering (compared to SVG) and high quality (compared to JPEG). However, these images can sometimes negatively impact the app’s performance. To address this issue, developers can use ‘TinyPNG’ to optimize and compress their PNG images without sacrificing quality. TinyPNG is a web service that uses advanced lossless compression techniques to reduce the file size of PNG images.
For one of our projects at Calcey, we were able to reduce the size of the production app by 67.43MB solely by optimizing image size.
For macOS users, a convenient tool called “TinyPNG4Mac” can be installed to optimize an entire folder of images quickly with a simple drag and drop. TinyPNG4Mac can be a helpful tool in streamlining the image optimization process and reducing the size of the PNG images used in a React Native app.
Optimizing the resolution of images
Services such as TinyPNG won’t be very effective if high-res images are being used.
As app developers, we often include alternative images to provide the best experience to our users. As displays continue to become better, it’s easy to be tempted to include the highest-resolution images in our apps. However, this isn’t always necessary.
Let’s take Android devices as an example. Most modern phones have a pixel density of 400-500 DPI, with the Samsung S22 Ultra having a pixel density of approximately 500 DPI. When an app is about to display an image, the Android operating system automatically determines the device’s pixel density and serves the correct alternative image. In the case of the S22 Ultra with WQHD+ mode enabled, Android will render images specified for the xxxhdpi density. For example, if the app is about to display ‘my-photo.png’, the OS will select the mdpi, hdpi or any other alternative version of the particular image based on the phone’s pixel density.
But what size should these xxxhdpi images be? According to the Android documentation, xxxhdpi images should be 4x the size of the base images. For example, if the base image size is 48 x 48 pixels (i.e.1x), the xxxhdpi image should be 192 x 192 pixels (Figure 1). It’s important to remember that designers typically work at a 1x scale because it’s regarded as best practice and makes easy design scaling possible.
- 36 x 36 (0.75x) for low-density (ldpi)
- 48 x 48 (1.0x baseline) for medium-density (mdpi)
- 72 x 72 (1.5x) for high-density (hdpi)
- 96 x 96 (2.0x) for extra-high-density (xhdpi)
- 144 x 144 (3.0x) for extra-extra-high-density (xxhdpi)
- 192 x 192 (4.0x) for extra-extra-extra-high-density (xxxhdpi)
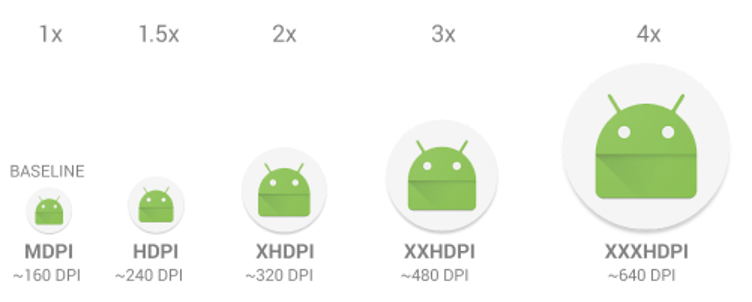
Figure 1: Relative sizes for images at different density sizes
So, it is not necessary to include ultra-high-resolution images.
Since this post focuses on React Native, you might wonder if there is a rule of thumb for what the resolution of any image you include should be. According to React Native 0.70 Documentation, it is sufficient to have 1x, 2x, and 3x scaled images for any mobile device. These scales are similar to the scaling factors used by iOS.
Including higher resolution images beyond 3x may not be of much use, as mobile devices will scale the images down to fit their displays. In fact, including higher-resolution images can increase the size of your app unnecessarily, as explained previously.
In creating a lightweight, high-performing app, it’s best to stick with the 1x, 2x, and 3x scaled images. This is especially true if you design your assets at 1x scale, and you can then use the 2x and 3x scales as needed.
In a project we worked on at Calcey, we reduced the size of the production app by an additional 20 MB by optimizing our images. Altogether, we reduced the production app size by a whopping 90 MB through image optimization alone. This demonstrates the significant impact image optimization can have on the size and performance of a React Native app.
Additionally, given below are a few other methods that can be used to arrive at a smaller app size.
For Animations: Use Lottie

Lottie is a library for Android, iOS, and the Web. It allows developers to include animations in their apps with ease, and is based on the open-source Bodymovin extension for Adobe After Effects. Lottie uses JSON files to describe the animation data.
Lottie can be a good choice for mobile apps compared to GIF and other animation formats.
- Small file size
Lottie animations are typically minor compared to GIF and other video formats. This can reduce the size of the app and improve its performance. - High-quality animations
Lottie animations are based on vector graphics, meaning they are scalable to any size without a loss in quality. This can especially be useful in creating animations with smooth, clean lines and curves. - Customizability
Lottie allows developers to customize the animations they include in their apps. This is useful in creating animations that match the style and branding of the app. - Premium makes things even better
Lottie’s Premium Service can be used to optimize Lottie files to obtain smaller animation files.
Analyze the JS Bundle
react-native-bundle-visualizer is a tool that can be used to visualize the bundle size of a React Native app. It provides a visual representation of the size of the app’s JavaScript, assets, and other dependencies, allowing developers to identify areas where they can optimize the size of the app.
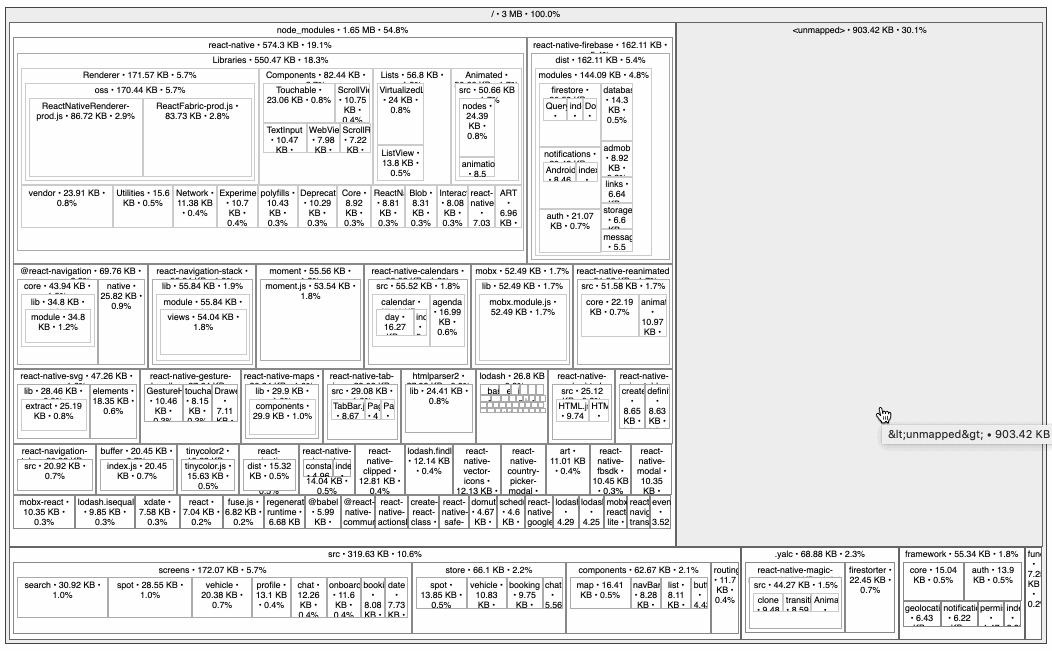
There are several reasons why developers might want to use react-native-bundle-visualizer:
- Identify areas for optimization
By visualizing the size of the app’s bundle, developers can quickly identify areas where they can optimize the size of the app. This can include optimizing images, removing unused code, and using code-splitting techniques. - Monitor changes to the bundle size
react-native-bundle-visualizer can be used to monitor changes to the bundle size over time, allowing developers to track the impact of their optimization efforts. - Improve app performance
Reducing the size of the app’s bundle can improve app performance, particularly on devices with lower specifications. Using react-native-bundle-visualizer, developers can identify and address problem areas contributing to a larger bundle size.
Analyze the Android APK file:
The Android APK Analyzer is a tool that allows developers to analyze the contents of their Android app packages (APKs) and understand their size and composition. It’s included in Android Studio and can be used to examine the size of the app’s code, resources, assets and identify potential areas for optimization.
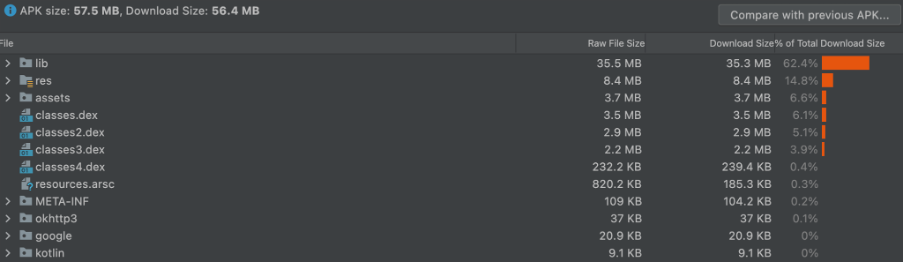
Figure 2: Analysis of an APK
One of the main benefits of using the Android APK Analyzer is that it allows developers to identify and optimize the size of their apps. For example, developers can use the tool to identify resources that take up a large amount of space e.g. large images or unused code. They can then take steps to optimize these resources, such as by compressing images or removing unused code.
By following the tips and techniques outlined here, you’ll be well on your way to building lightweight, high-performing React Native apps users love. And remember, every little bit of optimization can make a difference – even reducing the size of your app by just a few megabytes can vastly improve the user experience and make your app stand out in a crowded marketplace. Happy coding!